Thursday, July 25, 2013

2013 Classroom Preview

Ok...so I know July is not over yet, but I have Summer School starting on Monday and my classroom had to be transformed from a Kindergarten Room to a Title 1 Resource Room. For the last five years, I have taught Kindergarten and am now embarking a new and exciting journey of being a Title 1 Teacher. I will have small groups of 1-4 students off and on all day as well as other testing, grant writing and paperwork duties and such. I wanted to do a total overhaul on my classroom since it will need to suit 1st graders, 2nd graders and 3rd graders. Our school colors at black, silver and teal, but I wanted it a little more fun than just school colors, so I decided to add a punch of lime! My classroom is not quite finished, but I thought I'd give you a sneak peak as to what has been going on in the chaos that is my classroom right now...

These are the fabrics that first inspired me! 
I fell in love in the Fabric Section of Hobby Lobby! I plan on making them into padded seats for a bunch of crates that I have. 

A quick {never cheap} trip to the school supply store left me with this wonderful loot! I get excited just looking at it! That jar has these really cool class rocks that have one flat side (floral section with the other glass jewels) that I'm going to be turning into coordinating magnets for my white board with heave duty magnets (also found at Hobby Lobby) and E6000 Glue. 


Here is my helper supervisor for one of my work days! Needless to say...I didn't get very much work done that day! Good thing Mommy has a lot of manipulatives to keep little hands busy! That monster border was fun for a few years and the Kindergartners loved it, but it's time for something fresh and new!


That flower is also going to be turned into a magnet. I have a pair of the them that I found at Hobby Lobby as well and they match the fabric I bought! LOVE! One of my other favorite things is that bamboo print in the middle. It's fadeless paper with a bamboo pattern on it. I got that at the ABC Toy Zone. It was the perfect backdrop for my Boggle Board!


Here is a picture of the Boggle/Reading Corner and the crates that I'm going to be making seats for. The monster border is now gone and the bottom half of the black is covered with the bamboo paper. (I use black plastic for bulletin board backgrounds because it doesn't fade and holds up pretty well.) Those shelves in the bottom left picture hold our small group reading games and the Add It Up board has been revamped. That small black table will also be a small group activity center for summer school and possibly during the school year as well. 

Here's a picture of the little bit of help I got while Graysen came to work with me!


This is a close up of each section on my giant bulletin board wall. (It's a "fake" partition wall that could be opened up to make one big classroom with the room next door, but we just use it as a big bulletin board.) Check out my post here to see how I made that ribbon border out of butcher paper. 

Here is a shot of the back wall almost complete. The rest of the room is not quite done, but as soon as I finish, I will post final pictures of the room complete. 

MB

DIY Bulletin Board Ribbon Border

Sorry I have been MIA lately. I have been frantically busy getting my classroom ready. Summer School starts Monday! I decided to totally overhaul my classroom since I was switching it from the Kindergarten Room it has been for the last 5 years into a Title 1 Resource Room. The room had to fit students who range in age from 1st grade to 3rd grade this year and I decided on a teal and lime theme. (Our school colors are Black, Silver and Teal) I am LOVING it! Here's one quick and easy way I updated my bulletin boards. I cannot tell you how easy this is and how amazing it looks! 

First, I took a long piece of butcher paper (we have big rolls of it in several colors) and loosely folded rolled it up so I didn't have to cut long strips, I could make a short cut and it cut the whole length at once. (A major time saver)
I used a random piece of boarder that I had laying around so that I could make each strip the same size. 
Once you have your strips, bunch them, scrunch, them and make them very wrinkly. The wrinklier, the better! (Is wrinklier a word???) 
I then bunched and scrunched it on the board and stapled it in several places. Fluff it up and you're done! 
I have a huge "fake" wall on one side of my room that is actually a divider between my room and the room next door. Technically, you could open the divider and have one huge room, but we just use it as a big bulletin board. I have it sectioned off, so that is why you see two boarders with the paper ribbon.  Excuse the crooked photo. I took it with my phone. I have black plastic as the background instead of paper. It doesn't fade and holds up great fairly well...if you don't have a bunch of 5 year olds picking at it during Daily 5 Read to Self! :)
I will be posting an update on how the classroom makeover is coming soon!
MB

Saturday, July 13, 2013

Tomorrow is a new day!

Via http://cloud9and3quarters.tumblr.com/


Anne Shirley said it best when she said that. I think too many times, we worry about the past and forget that we get to start over every single morning. My goal for myself lately has been to not worry so much and let things go. I've never been one to hold a grudge, but I am very over-analytical! I'm hard on myself and I need to remember that yes, tomorrow is a new day and I can shake it off and start fresh! 
What will your tomorrow bring?


Thursday, July 11, 2013

$10 Dollars + 10 Minutes = 3 Freezer Meals for the Grill

I've mentioned before how much Wildtree Products can save you time and money in the kitchen. Well...today, our grocery store was having a huge sale on meat. {SCORE} Most people choose to pass on meat that needs to be used in a day or two, but when you put it in a freezer meal...it doesn't matter. You get the best deals this way! 
So...for less than $10, I bought 4 center-cut loin pork chops and 2 ribeye steaks!
 As soon as I got home, I got out a couple Wildtree ingredients from the cupboard, a couple gallon sized freezer bags and went to work. 10 minutes later, I had three meals {I'll have leftovers for sure.} ready to go in the freezer to marinate so we can just throw them on the grill later. 
{Freezer meals have saved my life! I cannot tell you how fabulous it is to have a freezer full of meals ready to go at all time!}

Here's what I made!

LEMON ROSEMARY PORK CHOPS
2 Center Cut Loin Chops
Gallon Freezer Bag


I use the dump, squish, mush, freeze method of Freezer Meal making!
Dump all of the ingredients in the bag.
Mush and smush it all around to make sure that everything is coated well.
Squeeze all of the air out and freeze! 
When you are ready to eat, you just take it out the night before and thaw in the fridge. 
You can thaw in the microwave if you forget to take it out. {Like I usually do!}
I {try} to take out about 3 meals on Sundays and stick them in the fridge to thaw for the week. We always have leftovers and so 3 meals gets us at least 5 meals for the week and we can still eat out once and have something like frozen pizza one night as well. 

Here are the other two meals for the week!

CHIPOTLE LIME PORK CHOPS
2 Center Cut Pork Chops
Gallon Freezer Bag


RANCHER RIBEYES 
w/Blue Cheese Crowns
{Hubby's Favorite}
Gallon Freezer Bag


Make sure that you don't use too much Rancher or it will be very salty later. 
I try to make sure a little is all over but it's not coated. 
While you have the steaks on the grill, you can mix together the {crowns}.
You can do this before hand and freeze them, or just mix it up quick when grilling. 

BLUE CHEESE CROWNS
1/2 Cup Bread Crumbs
1/4 Blue Cheese Crumbles
3Tbs Melted Butter
Mix all of this together in a bowl to form a paste. 
(Measurements are approx.)
Make the paste into small patties and place on the steak for the last couple minutes of grilling so that the cheese starts to melt and bread crumbs get crispy. 

There you have it! 
$10, 10 minutes and 3 meals ready to throw on the grill to stick in the freezer. 


Happy Grilling!
MB


Monday, July 8, 2013

Wildtree Spaghetti Sauce with Meatballs

Since we had a bunch of sauce left over from last night's Grilled Pizza, I decided to use it on spaghetti tonight and make some meatballs with the Herb Grilling Marinade
For those of you that missed last night's post, here's the quick and easy recipe for homemade spaghetti or pizza sauce using Wildtree's Hearty Spaghetti Blend .  

Mix 2 Tablespoons of the Hearty Spaghetti Blend seasoning into a can of tomato sauce and Voila! 
Healthy, homemade spaghetti sauce for around $1.00!


For the meatballs, I used: 
1lb 97% lean ground beef
1 egg
1 Cup of Breadcrumbs
(I used the Secret Breading from Dockside Fish Market in Grand Marais, MN.)
2-4 Tablespoons of the Herb Grilling Marinade

Preheat the oven to 350*
Mix all of the ingredients together well in a medium sized bowl with your hands.
Shape the meat into small ping pong ball sized meatballs.
Bake on a baking sheet for 20-25 minutes, or until cooked thoroughly.

Serve sauce and meatballs over your favorite pasta.
Top with Italian Cheese and a side of garlic bread!


It must have been a great meal because Graysen looked like he thoroughly enjoyed himself!


Happy Eating!
MB


Monday Morning Meeting

Monday morning is here and while I need to go into school to get my classroom ready for Summer School, which is starting in a couple weeks, I had an early morning meeting to attend first. I know, I know...Monday morning meetings SUCK right? Well...when your meeting involves chocolate combined with coffee on the front porch with the sun coming up, I won't complain!

After dropping Graysen off at daycare this morning, (I luckily get to walk him two blocks down the street.) I took a few minutes to myself with one of my loves (COFFEE) on the front porch, watching the world wake up!


Sunday, July 7, 2013

Wildtree Homemade Grilled Pizza

Tonight for supper, Tim and I made homemade grilled pizzas with the Wildtree products that I sell. They were fabulous and here's how you can make them too!
It only takes a few ingredients plus whatever toppings you choose to put on it.
(You can purchase any of the products used by either emailing me or ordering from my website linked above.)

For the dough, you will need:
Wildtree Pizza Dough
Wildtree Grapeseed Oil in your choice of flavor 
(I chose to use Roasted Garlic)
1/2 Cup warm water

For the sauce, you will need: 
Wildtree Hearty Spaghetti Blend Seasoning
Tomato Sauce

To make the sauce: 
Mix 2 Tablespoons of Wildtree Spaghetti Blend into the tomato sauce and Voila!

To make the dough and pizzas:
1: Whisk Wildtree dry ingredients, 2T GSO (grapeseed oil) and water together
2. Whisk until a ball forms
3. Knead dough for two minutes on a slightly floured surface until its stretchy and smooth. 
Let dough sit on counter for 10 minutes to rest.
4. Press dough into either one 12-14in crust, or two 6-7in crusts.
5. Dough will look rustic...just the way you want it to!
6. Brush a small amount of GSO onto the crust and put oil side down on a hot grill.
7. After grilling for a couple minutes, take crusts off and top grilled side with sauce and toppings.
8. Make sure that you don't load up on toppings, or it will be soggy. 
9. Put it back on the grill for a couple minutes to grill the other side of crust and cook the toppings. 

 ENJOY!

MB


Saturday, July 6, 2013

Easy Breezy DIY House Numbers

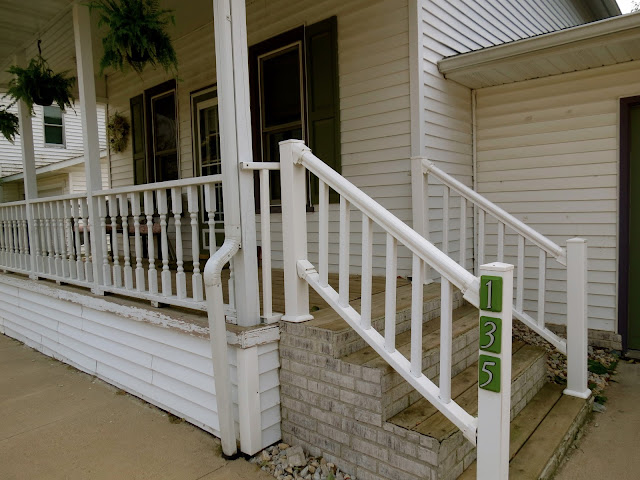
So...our house numbers were really cheap and pretty ugly looking to start with. They were there when we moved in and right in the middle of a random pole on our front porch. We took them down when we painted the porch from an extremely awful periwinkle blue, to white and we never put them back up. We  I had been debating on what to use instead. I saw this post on Pinterest and was inspired to make my own version. 
The numbers are from Menards and the wooden blocks were around $.50 each at Michaels. I already had the acrylic paint (Martha Stewart Brand from Michaels) and the foam brush. All together, this project cost right around $5.00 to make. 

I used my trusty E6000 glue to glue them to the bottom post of the front steps leading up to the porch. 


I really like the way they turned out and they go great with our green shutters.


MB

Thursday, July 4, 2013

4th of July Festivities

Red, White & Blue and star spangled everything!
That was the theme of this year's 4th of July at our house.
(Isn't that the theme every year??) 
This year, however, I went all out because we had family from out of town gathering at our house, which happens to be the house that my dad and his siblings grew up in. Plus...the town's festivities take place in the park across the street from my house. I grew up just a couple blocks down the road and fondly remember the same celebration as a child. Hello NOSTALGIA! Here's what our festive day(s) entailed. Did I mention that the 4th of July is my favorite holiday? But really...any reason to throw a theme party is ok with me!
 I love finger foods at parties. It makes for less stress for guests when enjoying them and you don't need to worry about a lot of utensils etc. These Strawberry Shortcake Kabobs were a huge hit, especially with my nephew. I'm pretty sure he had 10! I found a loaf of Angel Food cake in the grocery store bakery section and used my handy dandy star-shaped cookie cutter to make the cake stars. Pop those on a skewer with some strawberries and blueberries and BAM...festive holiday dessert on a stick!
 Aren't these lobster plates killer? The only thing to make it better is if we really were in New England having a lobster bake!
Ok...I'm totally in love with festive straws. I have a whole cupboard bursting with themed straws, toothpicks and drink markers. Plus, everything looks better displayed in a mason jar! I LOVE mason jars! You will soon find that out. They have so many practical and adorable uses besides just housing jams and jellies. 


Our 4th of July fun started on the 3rd. Graysen and I made sure that everyone going to the park and walking by during the day would get a great big hello from us!


I found these amazing light up balloons and was a little skeptical at first, but they were surprisingly cool. They have a tiny LED light inside and once it turns dark, they light up the yard and make it look so magical! Graysen thoroughly enjoyed them!


Here is my niece. Doesn't this look like the epitome of the 4th of July! She could be Lady Liberty! 

Once it got dark, we lit off fireworks fountains of sparks. (The only kind that are legal in MN!)


 Wow...check out how much Graysen has changed in a year! Last year, he was 6 weeks, and now this year, he's 13 1/2 months!! 

Our 4th of July Day started out with a Pancake Breakfast at the fire hall. I secretly wanted to bring my star-shaped cookie cutter along to cut everyone's pancakes into stars, but I refrained! Gray also got to see all of the fire trucks! Seriously though people, those hoses are HUGE! I cannot even fathom controling  holding that with water rushing through it. 

Graysen was in the Kiddie Parade with two of his cousins and they won "Most Patriotic"! I may be a little biased, but...I have to agree! Here is his prize winning wagon. 

Graysen even gave his princess rides in it during the Grand Parade. 


After the parade, everyone came to our house to grill out. Check out our "Bomb Pops". They were a huge hit. (Notice my mason jars with fun lids for the straws. They are my new favorite party accessory!)
Here's how to make it. We made ours without alcohol since we had beer and other adult beverages, but you could totally add some vodka or rum to the fruit punch first.

Ingredients: 
Red Fruit Punch
Diet 7UP
Blue Food Coloring
Ice

*Put a few drops of food coloring in the Diet 7UP to make it blue. 
*Fill the glass 1/2 full with ice
*Add a small amount of Fruit Punch. 
(If you add too much, it just ends up purple.)
*Fill the rest of the glass with ice
*Carefully pour Diet 7UP on top. 
*DO NOT STIR
*ENJOY!


They are sort of hard to see, but I also made Watermelon Appetizers and Firecracker Cupcakes along with the Strawberry Shortcake on a Stick. Take your handy dandy star-shaped cookie cutter and cut out watermelon stars. Top them with a piece of cubed feta and a blueberry. I would have really liked to add Pop Rocks to the top of the cupcakes to really give them some BANG in your mouth, but since we have a one year old, we thought we would save that for next year. I did find  really neat firecracker cupcake toppers at Michaels' though. 


We ended the day sitting on the front porch, watching the town's firework display. A perfect ending to a perfect holiday! Tomorrow, Tim and I are golfing in a Veteran's Tournament and then grilling out again with friends over the weekend to really finish off the holiday weekend right!
What fun things did you do over the 4th??

MB